 犬と一緒に獣医をしますか?
 犬が喧嘩で怪我をしたり、車にぶつけられたりするのを見たことがありますか?たぶん、頭を振って立ち去ることしかできなかったでしょう。あなたが気にしなかったからではなく、あなたが犬に近づいて調べる方法や次に何をすべきかを知らなかったからです。特にあなたが自分の犬を飼っているなら、あなたは準備をしたいと思うでしょう。あなたの犬は緊急事態で助けをあなたに依存しているからです。
この記事では、自信を持って応急処置を行い、ペットの命を救うために必要な情報とテクニックを紹介します。 CPRの実施から虫刺されの治療まで、さまざまな犬の緊急事態に対処する方法を学びます。
傷ついた犬やおびえた犬を適切に拘束する方法を学ぶことから始めましょう。これは、ほとんどの犬の怪我を治療するための最初の仕事になるからです。
怪我をした犬は通常、怯えて痛みを感じます。あなたの存在に非常に安心していない限り、逃げようとしたり、噛んだりすることもあります。したがって、負傷した犬に近づくときは、次のヒントを使用することが重要です。
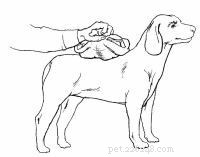
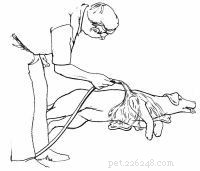
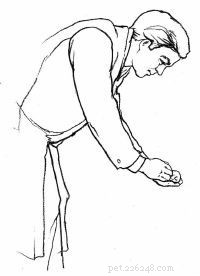
ステップ1: 犬にゆっくりと近づき、心強い声で話します。
ステップ2: 犬に触れずに犬に近づきます。
ステップ3: 犬に身をかがめる。話し続けながら、その目と表情を観察します。
ステップ3a: 犬が目を丸くして唸り声を上げている場合は、ペットを飼おうとしないでください。手順4に進みます。
ステップ3b: 犬が震え、頭を下げ、口に「笑顔」の外観をしている場合は、最初に顎の下で、安心のために犬を撫でてください。これが許可されている場合は、犬の頭を撫でてください。
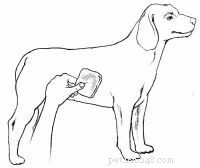
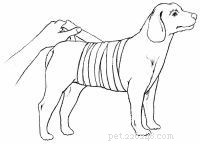
ステップ4: 犬の首にひもをつないでください。ロープ、ネクタイ、ベルト、破れたぼろきれなど、入手可能なあらゆる素材を使用してください。
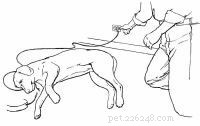
ステップ5: 一人でいる場合は、柵の支柱などの固定された物体の周りにひもを置きます。犬をこの物体に引き寄せ、ひもを結び、犬が頭を動かせないようにします。
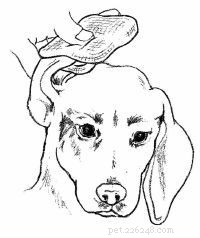
ステップ6: 自分を守るために犬を銃口で撃ちます。
ステップ6a: 長いロープ、破れたぼろきれ、またはネクタイを使用して、犬の銃口をループし、あごの下に1本の結び目を作ります。
ステップ6b: ロープ、ぼろきれ、またはネクタイの端を耳の後ろに持ってきて、弓で結びます。
ステップ7: あなたが一人の場合は、治療の実施に進んでください。
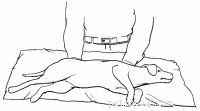
ステップ8: 可能であれば、犬をテーブルまたは他の隆起した表面に置きます。
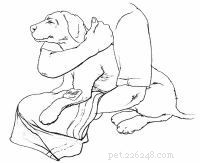
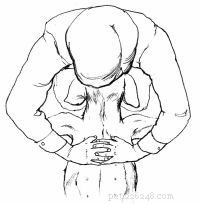
ステップ8a: 犬が小さい場合は、片方の手で首輪をつかみ、もう一方の腕を背中と体の周りに置きます。同時に、首輪を前に引いて犬の体を持ち上げ、体に抱きかかえます。
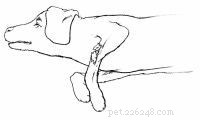
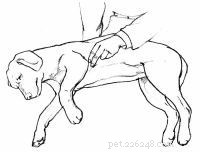
ステップ8b: 犬が大きい場合は、片方の腕を首の下に滑り込ませ、喉を腕の曲がりくねったところに保持します。犬が簡単に呼吸できることを確認してください。もう一方の腕を犬の胃の下に置きます。両腕で持ち上げます。
ステップ8c: 犬が非常に大きい場合は、片方の腕を首の下に滑り込ませ、胸を腕の曲がりくねったところに保持します。犬が簡単に呼吸できることを確認してください。もう一方の腕を犬の尻の下に置き、腕を互いに向かって押して、犬を持ち上げます。
ステップ8d: 犬をテーブルに置いている間、アシスタントに治療を依頼してください。
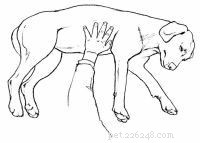
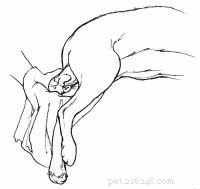
ステップ9: 犬を横向きにしたい場合:
ステップ9a: 立ったり、ひざまずいたりして、犬が頭を右に向けて目の前にくるようにします。
ステップ9b: 犬の背中に手を伸ばし、右手であなたに最も近い前脚をつかみ、左手であなたに最も近い後脚をつかみます。
ステップ9c: 犬の足をあなたから遠ざけ、犬を体の下にスライドさせます。
ステップ9d: 右手で両方の前足をつかみ、左手で両方の後足をつかみます。
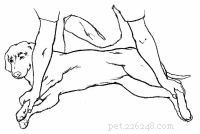
ステップ9e: 右腕で犬の首をそっと押さえます。
ステップ9f: アシスタントに治療を依頼してください。
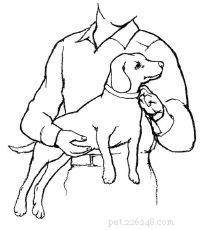
ステップ10: 犬を座らせたい場合:
ステップ10a: 片方の腕を犬の首の下に滑り込ませ、喉を腕の曲がりくねったところに保持します。犬が呼吸しやすいことを確認してください。
ステップ10b: もう一方の腕を犬の背中とお腹の周りに置きます。
ステップ10c: 犬を体に押し付け、犬の後部に体重をかけます。
ステップ10d: アシスタントに治療を依頼してください。
ステップ11: 犬を立たせたい場合:
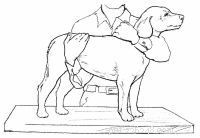
ステップ11a: 片方の腕を犬の首の下に滑り込ませ、喉を腕の曲がりくねったところに保持します。犬が呼吸しやすいことを確認してください。
ステップ11b: もう一方の腕を犬の胃の下に置きます。
ステップ11c: 犬を体に向かって押し、上に持ち上げます。
ステップ11d: アシスタントに治療を依頼してください。
犬を拘束する方法を学ぶことは、ほとんどすべてのペットの緊急事態であなたを助けます。それでは、負傷した犬を獣医に運ぶ方法を見てみましょう。
応急処置キットの必需品ペットの飼い主は、犬の緊急事態に備えて次のアイテムを用意しておく必要があります。
続きを読む
負傷した犬を拘束したら、できるだけ早く獣医に連れて行きたいと思うでしょう。傷ついた犬を必要以上に動かさないようにし、獣医師に電話して、到着の準備ができていることを確認してもらいます。それまでの間、次のヒントを参考にして、ペットを細心の注意を払って輸送してください。
ステップ1: 犬が小さい場合:
ステップ1a: 片方の手で襟をつかみ、もう一方の腕を背中と体の周りに置きます。
ステップ1b: 同時に、首輪を前に引いて犬の体を持ち上げ、体に抱きかかえます。
ステップ2: 犬が大きい場合:
ステップ2a: 片方の腕を首の下に滑り込ませ、喉を腕の曲がりくねったところに保持します。犬が呼吸しやすいことを確認してください。
ステップ2b: もう一方の腕を犬の胃の下に置きます。両腕で持ち上げます。
ステップ3: 犬が非常に大きい場合は、片方の腕を首の下に滑り込ませ、胸を腕の曲がりくねったところに保持します。犬が簡単に呼吸できることを確認してください。もう一方の腕を犬の尻の下に置き、腕を互いに向かって押して、犬を持ち上げます。
ステップ4: 犬を獣医に輸送します。
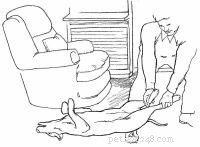
骨折が疑われる場合は、フラットボードを使用する必要があります。
ステップ1: ストレッチャーとして毛布またはフラットボードを使用してください。ボードを使用している場合は、ステップ2に進みます。ブランケットを使用している場合:
ステップ1a: 片方の手を犬の胸の下に置き、もう一方の手を犬の後ろの下に置きます。犬を慎重に持ち上げるか、毛布の上にスライドさせます。
ステップ1b: 犬を獣医に輸送します。
ステップ2: フラットボードを使用している場合:
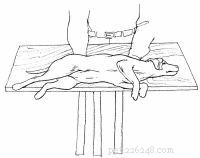
ステップ2a: 犬のサイズに応じて、テーブルリーフ、アイロン台、大きなまな板、または取り外し可能な本棚を使用します。使用するものがすべて車に収まるようにしてください。
ステップ2b: 犬の首が休む領域を避けて、ボードの下に等距離に2つまたは3つの長い布またはロープを置きます。
ステップ2c: 片方の手を犬の胸の下に置き、もう一方の手を犬の後ろの下に置きます。犬を慎重に持ち上げるか、ボードにスライドさせます。
ステップ2d: 犬をボードに結び付けます。
ステップ2e: 犬を獣医に輸送します。
多くの応急処置の状況で役立つことができるもう一つのテクニックはあなたのペットに経口薬を与えることです。次のページで、薬の投与に関する役立つヒントを確認してください。
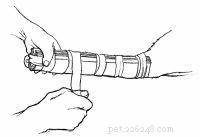
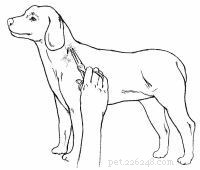
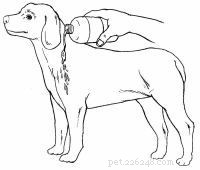
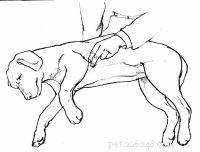
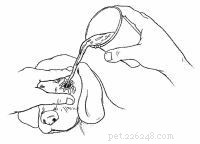
重傷の後に鎮痛剤を投与する必要がある場合でも、ペットの毎月のフィラリアの錠剤の時間である場合でも、犬に経口薬を簡単に与える方法を学ぶことは知っておくと便利なトリックです。次のヒントを参考にして、犬に液体または錠剤の薬を投与してください。
ステップ1: 犬を拘束します。犬の扱いが難しい場合は、犬を拘束するための支援が必要になる場合があります。
ステップ1a: 静かに安心して話すことで、犬の不安を和らげます。
ステップ1b: 片方の腕を犬の首の下に滑り込ませ、喉を腕の曲がりくねったところにそっと保持します。犬が呼吸しやすいことを確認してください。
ステップ1c: もう一方の腕を犬の真ん中の上または下に通し、穏やかでしっかりとした圧力をかけて体をあなたの体に押し付けます。
ステップ1d: 必要に応じて、顎の動きがわずかになるように、マウスタイを緩く適用します。
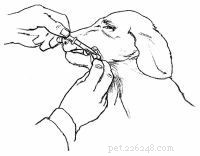
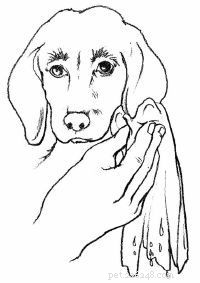
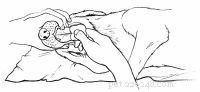
ステップ2: 犬の頭を少し後ろにそっと傾けます。
ステップ3: 犬の下唇を角で引き出してポーチを作ります。
ステップ4: プラスチック製のスポイトまたは投与量の注射器を使用して、一度に少しずつ液体をポーチに入れ、少量を飲み込んでから投与量を増やします。
ステップ5: 犬の喉をそっとこすり、嚥下を刺激します。
ステップ1: 犬を拘束します。犬の扱いが難しい場合は、犬を拘束するための支援が必要になる場合があります。
ステップ1a: 静かに安心して話すことで、犬の不安を和らげます。
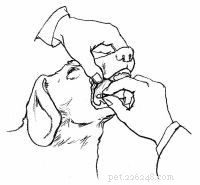
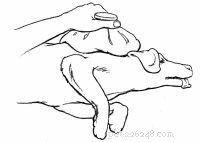
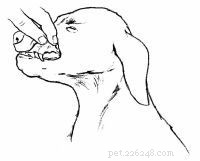
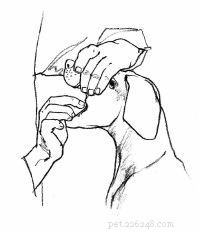
ステップ2: 犬の上顎を片手で銃口にかざします。
ステップ3: 片側を親指で反対側を指で押して、犬の唇を上歯に押し付け、犬の唇が歯と指の間にくるようにします。しっかりと圧力をかけて口を強制的に開きます。
ステップ4: もう一方の手の親指と人差し指の間にピルを持ち、犬の口のできるだけ後ろにピルを置きます。
ステップ5: 犬の喉をそっとこすり、嚥下を刺激します。
別の方法は、チーズ、ピーナッツバター、またはその他のおいしいおやつに錠剤を隠すことです。
犬の血は、重傷の兆候であるか、足にわずかな傷がある可能性があります。次のセクションでは、さまざまな兆候を見つける方法と、出血しているペットを助けるために何をすべきかについて説明します。
犬の足や脚は、割れたガラス、爪、その他の鋭利なものによる怪我に対して脆弱であり、切断すると大きく出血します。耳の上の皮膚が非常に薄いため、負傷した耳もひどく出血します。
出血による怪我の場合、応急処置の主な目的は、ショックにつながる可能性のある過度の失血を防ぐことです。ショックの兆候には、薄い歯茎または白い歯茎、急速な心拍、または急速な呼吸が含まれます。傷口から血液が噴出している場合は、動脈が切断されていることを意味します。これには、専門家による即時の対応が必要です。
犬の世話をする方法は、出血の場所と程度によって異なります。次の犬の世話のヒントは、さまざまな体の部位に応急処置を適用するのに役立ちます。
ステップ1: 必要に応じて犬を拘束します。
ステップ1a: 犬にゆっくりと近づき、心強い声で話します。
ステップ1b: 犬の首にひもを付けてから、固定物の周りにひもを置きます。犬をこの物体に引き寄せ、ひもを結び、犬が頭を動かせないようにします。
ステップ1c: 自分を守るために犬を銃口で撃ちます。
ステップ2: 傷口を滅菌ガーゼパッド、清潔な折りたたんだタオル、または衛生的なナプキンで覆います。
ステップ3: 破れたぼろきれやその他の柔らかい素材を包帯に巻き付け、包帯を所定の位置に保持するのに十分なだけしっかりと結ぶかテープで留めます。
ステップ4: 犬をすぐに獣医に運んでください。
ステップ1: 必要に応じて犬を拘束します。
ステップ1a: 犬にゆっくりと近づき、心強い声で話します。
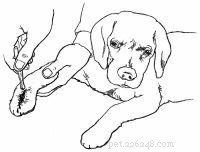
ステップ2: 負傷した部分の周りの髪の毛を切り取ります。
ステップ3: ガラスやその他の異物がないか傷口を調べます。表示されている場合は、指またはピンセットでオブジェクトを取り外します。皮膚を動かしたときに傷の下の組織が通り過ぎたように見える場合は、傷に縫い目が必要になる可能性があります。
ステップ4: 傷口をきれいな水で完全に洗い流します。適用時に痛みを引き起こす可能性のある家庭用消毒剤は避けてください。
ステップ5: 傷口を清潔な布、滅菌包帯、または衛生ナプキンで覆います。
ステップ6: ドレッシングの上に手を置き、しっかりと押します。
ステップ7: 出血を止めるためにドレッシングに圧力をかけ続けます。ドレッシングに血液が染み込んでいる場合は、取り外さないでください。さらにドレッシングを適用し、出血が止まるまで圧力をかけ続けます。出血が5分以内に止まらない場合は、犬を獣医に運ぶ間、傷口に圧力をかけ続けます。
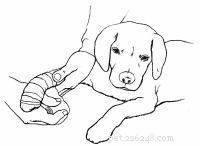
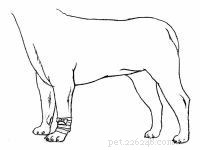
ステップ8: 破れたぼろきれまたは他の柔らかい材料を包帯の周りに巻き、包帯を付けたままにするのに十分しっかりとそれを結ぶかテープで留めます。傷の下から始めて、上向きに包みます。
ステップ9: 傷が縫い目を必要とするほど深い場合は、犬を負傷した脚から遠ざけ、すぐにペットを獣医に運んでください。
ステップ1: 必要に応じて犬を拘束します。
ステップ1a: 犬にゆっくりと近づき、心強い声で話します。
ステップ1b: 自分を守るために犬を銃口で撃ちます。
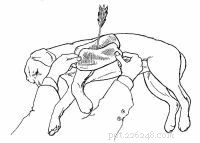
ステップ2: 傷口が胸にあり、「吸う」音が聞こえる場合は、空気が入らないように傷口にしっかりと包帯を巻いて、すぐに獣医に犬を運んでください。そうでない場合は、ステップ3に進みます。
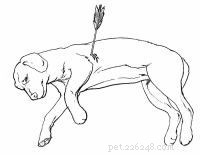
ステップ3: 矢印などの突き出た物体がある場合は、その物体を取り除こうとしないでください。そうでない場合は、ステップ4に進みます。
ステップ3a: 入り口の周りに清潔な布、滅菌ドレッシング、または衛生ナプキンを置きます。
ステップ3b: 入り口の周りにしっかりと包帯を巻いてください。
ステップ3c: 犬をすぐに獣医に運んでください。
ステップ4: 負傷した部分の周りの髪の毛を切り取ります。
ステップ5: ガラスやその他の異物がないか傷口を調べます。表示されている場合は、指またはピンセットでオブジェクトを取り外します。皮膚を動かしたときに傷の下の組織が通り過ぎたように見える場合は、傷に縫い目が必要になる可能性があります。
ステップ6: 傷口をきれいな水で完全に洗い流します。
ステップ7: 傷口を清潔な布、滅菌包帯、または衛生ナプキンで覆います。
ステップ8: ドレッシングの上に手を置き、しっかりと押します。
ステップ9: 出血を止めるためにドレッシングに圧力をかけ続けます。ドレッシングに血液が染み込んでいる場合は、取り外さないでください。さらにドレッシングを適用し、出血が止まるまで圧力をかけ続けます。
ステップ10: 破れたシートやその他の柔らかい素材を包帯に巻き付け、包帯を付けたままにするのに十分なだけしっかりと結ぶかテープで留めます。
ステップ11: 傷が縫い目を必要とするほど深い場合は、犬をすぐに獣医に運んでください。
ステップ1: 必要に応じて犬を拘束します。
ステップ1a: 犬にゆっくりと近づき、心強い声で話します。
ステップ1b: 自分を守るために犬を銃口で撃ちます。
ステップ2: 傷口を清潔な布、滅菌包帯、または生理用ナプキンで覆います。ドレッシング材をイヤーフラップの両側に置き、犬の頭の上に折りたたんでしっかりと保持し、出血を抑えます。
ステップ3: 破れたシートやぼろきれをドレッシング、耳、頭に巻き付け、耳全体が覆われていることを確認します。包帯をテープで固定するか、所定の位置に結びます。
ステップ4: 犬をすぐに獣医に運んでください。
爪が折れたり、短く切られすぎたりすることが、爪の出血の最も一般的な理由です。爪を切るのが苦手な場合は、必ず犬をグルーマーに連れて行ってください。
爪が折れた場合:
ステップ1: 必要に応じて犬を拘束します。
ステップ1a: 犬にゆっくりと近づき、心強い声で話します。
ステップ2: 犬を口ずさむことなく、壊れた爪を切ったり取り除いたりしないでください。
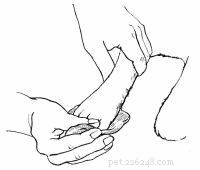
ステップ3: 清潔な布、滅菌包帯、または衛生ナプキンを爪に当てます。出血は数分で止まります。
ステップ4: できるだけ早く犬を獣医に輸送してください。
爪のカットが短すぎる場合:
ステップ1: 必要に応じて犬を拘束します。
ステップ1a: 犬にゆっくりと近づき、心強い声で話します。
ステップ1b: 犬の首にひもを付けてから、固定物の周りにひもを置きます。犬をこの物体に引き寄せ、ひもを結び、犬が頭を動かせないようにします。
ステップ1c: 自分を守るために犬を銃口で撃ちます。
ステップ2: 清潔な布、滅菌包帯、または衛生ナプキンを爪に当てます。
ステップ3: 少なくとも5分間、その領域にしっかりと圧力をかけ続けます。出血が止まるまで包帯を外さないでください。
ステップ4: 出血が15〜20分で止まらない場合は、できるだけ早く犬を獣医に運んでください。継続的な出血は、迅速に治療する必要のある出血性疾患を示します。
内出血は常に緊急事態です。内出血の兆候は、薄い歯茎または白い歯茎です。急速な心拍または呼吸;耳、鼻、口、または直腸からの出血。次の手順は、潜在的なショックがないか犬を治療し、すぐに専門家の助けを借りて犬を輸送するのに役立ちます。
ステップ1: 外傷からの出血がある場合は、ショックの治療をしてください。
ステップ1a: 歯茎が見えるように上唇をそっと持ち上げて歯茎を調べます。薄い歯茎または白い歯茎は、犬がほぼ確実にショック状態にあり、深刻な内傷や出血がある可能性があることを示しています。歯茎がピンク色の場合、犬はおそらくショックを受けていません。
ステップ1b: ハートビートを決定します。犬の胸の中央にある肘の後ろ約2インチのところに、指をしっかりと置きます。 10秒間の拍動数を数え、6を掛けます。犬がショックを受けている場合、その心拍数は1分あたり150拍を超える可能性があります。
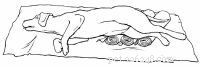
ステップ2: 頭を伸ばした状態で犬を横向きにします。
ステップ3: 犬の舌をそっと引き出して、気道を開いたままにします。
ステップ4: 枕や折りたたんだタオルの上に犬を置いて、犬の後部を少し持ち上げます。
ステップ5: 体温を節約するために、犬を毛布またはジャケットで包みます。
ステップ6: 犬をすぐに獣医に運んでください。
腹部膨満は、犬に突然死を引き起こす可能性のある深刻な状態です。次のセクションでは、膨満感の兆候と、ペットが膨満感に苦しんでいると思われる場合の対処方法について説明します。
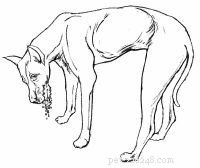
一見健康そうな犬が1時間以内にその命のために戦うことができるという事実を受け入れるのは難しいです。膨張は非常に深刻で、致命的となる可能性のある状態です。専門的な治療は緊急であり、遅らせるべきではありません。
膨満感は、他の犬種よりも大きくて胸の深い犬に影響を与えるようです。症状は劇的で紛れもないものであり、過度のよだれ、ペーシング、興奮などがあります。拡大した腹部;頻繁に嘔吐を試みると、大量の白い泡が発生するか、まったく発生しません。
膨満感が発生する理由についての満足のいく科学的説明はありません。基本的に、胃は膨らんだ風船のようにガスで満たされます。しかし、気球には拡張の余地があります。胃には何もないので、ガスは脾臓、肝臓、その他の内臓に圧力をかけます。
ペットが膨満している疑いがある場合は、すぐに獣医に犬を輸送してください。膨張の後に胃の捻転(胃の回転)が続くことが多く、これは数時間のうちにショックと死につながります。
膨満感とその後のねじれを防ぐために、犬に1回の大きな食事ではなく、1日に数回の小さな食事を与え、食後の激しい運動が避けられることを確認してください。
スプリントの取り付け方法など、ペットの足が骨折した場合の対処方法については、次のセクションを確認してください。
犬の場合、人間と同様に、すべての骨が破損しますが、脚の骨折がはるかに一般的です。犬は痛みに対する耐性が高く、ぶら下がっている足は痛みを引き起こさないように見えることが多いことを覚えておくことが重要です。したがって、骨折した手足を扱うことを恐れないでください(ただし、優しくしてください!)。犬はそれが痛い場合はあなたに知らせます。
探すべき兆候には、形が崩れているように見える、しなやかにぶら下がっている、体重を支えることができない、腫れている脚などがあります。また、薄い歯茎や白い歯茎、急速な心拍、急速な呼吸などのショックの兆候にも注意してください。
犬の骨折を適切にケアするには、次のヒントを使用してください。
ステップ1: 必要に応じて犬を拘束します。
ステップ1a: 犬にゆっくりと近づき、心強い声で話します。
ステップ1b: 犬の首にひもを付けてから、固定物の周りにひもを置きます。犬をこの物体に引き寄せ、ひもを結び、犬が頭を動かせないようにします。
ステップ1c: 自分を守るために犬を銃口で撃ちます。
ステップ2: 脚を調べて、骨折が開いている(骨折の近くに巻かれている、または骨が皮膚から突き出ている)か、閉じている(皮膚に骨折がない)かを判断します。
ステップ3: 骨折が閉じている場合は、手順4に進みます。骨折が開いている場合:
ステップ3a: 傷口をきれいな水で完全に洗い流します。
ステップ3b: 傷口を滅菌包帯、清潔な布、または生理用ナプキンで覆います。
ステップ3c: 骨折を副子固定しようとしないでください。スプリントされていない手足の下に大きな折りたたまれたタオルを持ち、犬をすぐに獣医に運びます。
ステップ4: 骨折した手足がひどく変形している場合、またはスプリントしようとしたときに犬がひどい痛みを感じているように見える場合は、停止して手順5に進みます。それ以外の場合は、骨のスプリントに進みます。
ステップ4a: スティック、新聞、雑誌、硬いボール紙など、入手可能なスプリント素材を使用してください。目的は、手足を固定することであり、リセットすることではありません。
ステップ4b: 破れた布またはガーゼで骨折した脚に添え木を取り付けます。
ステップ4c: ストリップをテープで留めるか、しっかりと結びますが、循環が損なわれる可能性があるほどしっかりと締めないでください。
ステップ4d: 犬をすぐに獣医に運んでください。
ステップ5: 骨折した手足がひどく変形している場合、または副子を付けようとしたときに犬がひどい痛みを感じている場合は、副子を付けていない手足の下に大きなタオルを持って支え、すぐに獣医に犬を運んでください。
次のセクションのヒントを確認して、ペットの火傷に備えてください。
犬は飼い主が料理をしている間、足元にいるのが大好きです。これは人間の親友の立派な特徴ですが、台所で沸騰したお湯や温かい食用油を使用している場合にも危険です。
犬は、火、熱、沸騰した液体、化学物質、および電気によって引き起こされる1度、2度、または3度の火傷を経験する可能性があります。すべてが痛みを伴い、死に至るまでのダメージを引き起こす可能性があります。痛みや皮膚の発赤によって証明される表面的な火傷は、通常、深刻ではありません。ただし、痛みを和らげるために、できるだけ早く応急処置を行う必要があります。
次のヒントは、対処している火傷の種類を特定するのに役立つだけでなく、怪我を最もよく治療する方法についての提案も提供します。
1度の火傷の兆候には、毛皮が無傷または歌われている、痛みを伴う病変、または水疱の可能性がある赤い皮膚が含まれます。 2度の火傷の兆候は、毛皮の歌や痛みを伴う病変で、腫れや水ぶくれを伴って黄褐色になります。これらの警告サインのいずれかに気付いた場合は、次のようにします。
ステップ1: 必要に応じて犬を拘束します。
ステップ2: 火傷した部分に冷水またはアイスパックを塗り、15分間皮膚に接触させたままにします。軟膏やバターを塗らないでください。
ステップ3: 火傷が犬の体の大部分を覆っている場合、または犬が火傷をなめることができる場所にある場合は、その部分を滅菌包帯で覆います。綿は使用しないでください。
ステップ4: 破れたぼろきれやその他の柔らかい素材を包帯に巻き付け、所定の位置に保つのに十分なだけしっかりと結ぶかテープで留めます。
ステップ5: できるだけ早く犬を獣医に輸送してください。
3度の火傷の兆候には、皮膚領域全体の破壊、黒または真っ白な病変、または簡単に抜ける毛皮が含まれます。また、薄いまたは白い歯茎、急速な心拍、または急速な呼吸などのショックの兆候にも注意してください。これらの兆候に気付いた場合は、次のようにします。
ステップ1: 必要に応じて犬を拘束します。
ステップ1a: 犬にゆっくりと近づき、心強い声で話します。
ステップ2: 犬のショックを調べます。彼または彼女がショックを受けていない場合は、ステップ3に進みます。
ステップ2a: 歯茎が見えるように上唇をそっと持ち上げて歯茎を調べます。薄い歯茎または白い歯茎は、犬がほぼ確実にショック状態にあることを示します。歯茎がピンク色の場合、犬はおそらくショックを受けていません。
ステップ2b: ハートビートを決定します。犬の胸の中央で、犬の肘の約2インチ後ろに指をしっかりと置きます。 10秒間の拍動数を数え、6を掛けます。犬がショックを受けている場合、その心拍数は1分あたり150拍を超える可能性があります。
ステップ2c: 頭を伸ばした状態で犬を横向きにします。犬の舌をそっと引き出して、気道を開いたままにします。
ステップ2d: 枕や折りたたんだタオルの上に犬を置いて、犬の後部を少し持ち上げます。体温を節約するために、犬を毛布またはジャケットで包みます。
ステップ3: 軟膏やバターを塗らないでください。火傷した部分にドライクリーニングのドレッシングを塗ります。綿は使用しないでください。
ステップ4: 破れたぼろきれやその他の柔らかい素材を包帯に巻き付け、所定の位置に保つのに十分なだけしっかりと結ぶかテープで留めます。
ステップ5: できるだけ早く犬を獣医に輸送してください。
化学火傷の兆候には、テレビン油、ガソリン、殺虫剤などの化学臭が含まれます。皮膚が赤くなった;または痛み。これらの兆候に気付いた場合は、次のようにしてください。
ステップ1: 必要に応じて犬を拘束します。
ステップ1a: 犬にゆっくりと近づき、心強い声で話します。
ステップ2: 石鹸と水でその部分を完全に洗います。化学物質を除去するために必要な回数だけ繰り返します。刺激の少ない石鹸を使用し、よく泡立ててください。いかなる種類の溶剤も使用しないでください。
ステップ3: 詳細な手順については、獣医に電話してください。
あなたの犬は何にでも入りますか?次のセクションで、気道を確保する方法やCPRを実施する方法など、窒息している犬の治療に関する応急処置のヒントを確認してください。
犬が異物を窒息させているとき、それはすぐに助けを必要とします。呼吸が困難になるほど、パニックになります。この緊急事態でのあなたの目標は、噛まれることなく犬の気道を開くことです。
犬が窒息している兆候には、口をつまむ、薄いまたは青い舌、明らかな苦痛、または意識不明が含まれます。犬が意識を失い、異物が存在すると思われる場合は、犬に心肺蘇生法(CPR)を行う前に気道を開く必要があります。犬が呼吸できない場合、犬を復活させる努力は無駄になります。
これはすべて非常に圧倒的に聞こえますが、以下に概説する基本的なヒントに従うことで、窒息したり無意識の犬を助けることができます。あなたの努力は犬の命を救うかもしれません!
ステップ1: 必要に応じて犬を拘束します。
ステップ1a: 犬にゆっくりと近づき、心強い声で話します。
ステップ2: 気道を確保します。
ステップ2a: 片手で上顎を銃口にかざして、犬の口を慎重に開きます。
ステップ2b: 片側を親指で反対側を指で押して、犬の唇を上歯に押し付け、唇が犬の歯と指の間にくるようにします。しっかりと圧力をかけて口を強制的に開きます。
ステップ2c: オブジェクトが見える場合は、指で取り外してみてください。
ステップ2d: オブジェクトを削除できず、犬が十分に小さい場合は、後ろ足をつかんで持ち上げます。逆さまにして激しく振ってください。振りながら背中を叩くと、オブジェクトを取り除くのに役立つ場合があります。
ステップ2e: 物を取り除くことができず、犬が大きすぎて拾えない場合は、犬を床に横向きに置きます。胸郭のすぐ後ろに手を置き、すばやくしっかりと押し下げて少し前に出します。リリース。オブジェクトが排出されるまで、すばやく数回繰り返します。
ステップ3: オブジェクトを取り除くことができない場合は、犬をすぐに獣医に輸送してください。
ステップ4: オブジェクトを外して犬が呼吸していない場合は、犬の胸の真ん中にある肘の後ろ約2インチに指を置いて、心拍を感じてください。
ステップ5: 犬の心臓が鼓動していない場合は、手順6に進みます。鼓動している場合は、人工呼吸を行います。
ステップ5a: 犬を横向きにします。
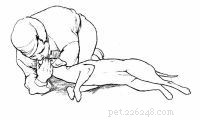
ステップ5b: 犬の頭と首を伸ばします。犬の口と唇を閉じたまま、鼻の穴にしっかりと吹き込みます。 3〜5秒ごとに1回の呼吸を行います。深呼吸をして、抵抗を感じるか胸が上がるのを見るまで繰り返します。
ステップ5c: 10秒後、停止します。胸の動きを観察して、犬が自力で呼吸していることを示します。
ステップ5d: 犬が呼吸していない場合は、人工呼吸を続けてください。
ステップ6: 心臓が鼓動していない場合は、CPRを実行します。
ステップ6a: 犬を仰向けにします。
ステップ6b: 犬の頭をひざまずきます。
ステップ6c: 手のひらを胸の両側に置いて、犬の胸に手を握ります。
ステップ6d: 手のひらを胸にしっかりと押し付けて「2」カウントし、離して「1」カウントします。適度な圧力が必要です。 1分間に約60〜90回繰り返します。
ステップ6e: または(30秒後)、犬の口と唇を閉じたまま、鼻孔にしっかりと吹き込みます。 3秒間息を吹き、深呼吸をして、抵抗を感じるか、犬の胸が上がるのを見るまで繰り返します。これを1分間に10〜20回繰り返してみてください。原則として、1回の呼吸に対して約5回の心臓圧迫のCPR比を使用します。
ステップ6f: 1分後、停止します。呼吸の動きについて胸を見て、胸の中央にある犬の肘の後ろ約2インチに指を置いて、心拍を感じます。
ステップ6g: 犬の心臓が鼓動していない場合は、CPRを続けます。心臓が鼓動し始めても犬がまだ呼吸していない場合は、ステップ5に戻ります。
ステップ6a: 犬を横向きにします。
ステップ6b: 手のひらを犬の胸の真ん中に置きます。
ステップ6c: を押すと「2」、離すと「1」になります。しっかりとした圧力が必要です。 1分間に約60〜90回繰り返します。
ステップ6d: または(30秒後)、犬の口と唇を閉じたまま、鼻孔にしっかりと吹き込みます。 3秒間息を吹き、深呼吸をして、抵抗を感じるか胸が上がるのを見るまで繰り返します。これを1分間に10〜20回繰り返してみてください。
ステップ6e: 1分後、停止します。呼吸の動きについて胸を見て、胸の中央にある犬の肘の後ろ約2インチに指を置いて、心拍を感じます。
ステップ6f: 犬の心臓が鼓動していない場合は、CPRを続けます。心臓が鼓動し始めても犬がまだ呼吸していない場合は、ステップ5に戻ります。
ステップ7: 犬をすぐに獣医に輸送してください。 CPRまたは人工呼吸は、獣医に行く途中、または犬が呼吸し、その心臓が補助なしで鼓動するまで継続する必要があります。
発作を目撃することは恐ろしいことかもしれませんが、慌てる必要はありません。次のページのヒントを参考にして、ペットがけいれんや発作を起こした場合に役立ててください。
けいれんまたは発作は、脳から体の筋肉が絶えず電気的に発火した結果です。けいれんが致命的となることはめったになく、ほとんどの場合、ほんの数分しか続きません。その後、典型的な発作の後に15分から30分の回復時間が続きます。その間、犬はぼんやりと混乱する可能性があります。
すべての発作がてんかんによるものではありません。鉛や他の毒物、肝臓病、さらには脳腫瘍によって引き起こされるものもあります。発作やけいれんは決して軽視してはいけません。 The problem should be discussed with your veterinarian as soon as possible.
The most important thing to do if your dog is experiencing a seizure is to protect it from self-injury. Be patient, don't panic, and use the following tips to provide proper care.
ステップ1: DO NOT place your fingers or any object in the dog's mouth.
ステップ2: Pull the dog away from walls and furniture to prevent self-injury.
ステップ3: Seizures can raise your dog's body temperature fast, so don't wrap the dog in a blanket or towel for comfort until the seizure is over. Instead, place cool washcloths on his feet to help keep his temperature from rising.
ステップ4: After the seizure has stopped, contact your veterinarian for further instructions. You can now wrap your dog in a towel or blanket to comfort him after the seizure he's alert.
ステップ5: If you're able to, time your dog's seizure. If it lasts less than 2 minutes, he should be OK but you should still consult with your veterinarian. If it lasts between 2 and 5 minutes, this is starting to hit the warning zone and you dog should take your dog to the vet as soon as possible. If the seizure lasts longer than 5 minutes, he needs to be treated by your veterinarian immediately.
A common ailment among most pets, diarrhea can become a serious problem if not treated properly. Turn to the next section for helpful tips.
Diarrhea is a commonly encountered problem that occurs when food is passed through a dog's intestine too rapidly. It can be caused by allergies, milk, parasites, spoiled food, or bacterial infection. There are also more serious causes such as tumors; viral infections; and diseases of the liver, pancreas, and kidney.
Be sure to seek professional help if blood, severe depression, or abdominal pain are present in your pet. Otherwise, use the following suggestions to help ease a dog's discomfort.
ステップ1: Remove all food for 12 to 24 hours. Water is important to prevent dehydration in severe diarrhea. It should not be removed.
ステップ2: If blood appears or if diarrhea continues for more than 24 hours, contact the veterinarian. He or she will probably want to see a stool sample.
ステップ3: After at least 12 hours, treat the dog by feeding it a bland diet such as boiled skinless chicken and rice (50:50 mixture). When stools begin to form, slowly phase back to regular diet. Kaopectate or Pepto-Bismol can be safely used in dogs. Call your veterinarian for the correct dosage for your pet.
When people think of animal bites, they usually think of a human being bit by a dog. But dogs can also be the victims of bites from dogs or other animals lurking in the backyard. Check the next section for first-aid tips when your dog experiences an animal bite.
When a dog gets into a fight with another dog, a cat, or a wild animal, damage can occur to both the skin and the underlying tissue. Many dogfights can be avoided by not permitting your dog to run loose and by keeping it on a leash when you walk it. The dog should also be trained to obey your commands.
If your dog does get into a fight, do not try to break it up with your bare hands. A fighting dog will bite anything in its way, including you. Pull your leashed dog out of harm's way or use a long stick. After the fight is over, examine your dog carefully for hidden wounds. You'll often find punctures around the neck area and on the legs. Look through the hair carefully to find bloodstains, which would indicate the skin has been punctured.
It is important to determine if the biting animal has been inoculated against rabies. If the biter is a wild animal such as a skunk or raccoon, efforts should be made to destroy it so the brain can be examined for rabies. Never touch the wild animal with your bare hands, even after it has been killed. Wear gloves or wrap the body in a blanket.あなたの獣医が狂犬病の検査を担当します。
To provide proper care to a dog suffering from an animal bite, use the following tips.
ステップ1: Restrain the dog if necessary.
ステップ1a: Approach the dog slowly, speaking in a reassuring tone of voice.
ステップ1b: Slip a leash around the dog's neck, then place the leash around a fixed object. Pull the dog against this object and tie the leash so the dog cannot move its head.
ステップ1c: Muzzle the dog to protect yourself.
ステップ2: Clip the hair around the wound.
ステップ3: 傷口をきれいな水で完全に洗い流します。 Avoid home antiseptics, which may cause pain when applied.
ステップ4: Examine the wound.皮膚を動かしたときに傷の下の組織が通り過ぎたように見える場合は、傷に縫い目が必要になる可能性があります。
ステップ5: DO NOT bandage.過度の出血がない限り、傷口を排出させます。傷が過度に出血する場合は、次の手順に従ってください。
ステップ5a: Cover wound with clean cloth, sterile dressing, or sanitary napkin.
ステップ5b: ドレッシングの上に手を置き、しっかりと押します。
ステップ5c: Keep pressure on the dressing to stop the bleeding.
Step 5d: If blood soaks through the dressing, DO NOT remove it.さらにドレッシングを適用し、出血が止まるまで圧力をかけ続けます。
ステップ6: If the wound is deep enough to require stitches, transport the dog immediately to the veterinarian.
ステップ7: Be sure to contact your veterinarian if your dog is not current on its rabies vaccination.
Dogs are natural swimmers, but situations can occur where a dog swims too far and starts drowning. Turn to the next section to find out how to best handle this type of emergency.
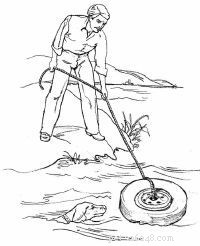
Dogs are naturally good swimmers for short distances, but they can get into trouble. Sometimes they get too far from the shore and tire trying to swim back, or they fall into a swimming pool and cannot get up the steep sides.
Always protect yourself when trying to rescue a drowning dog. An extra few moments of preparation can save two lives -- yours and the dog's. Also be sure to watch for signs of shock, which include pale or white gums, a rapid heartbeat, or rapid breathing. Use the following tips when rescuing a drowning dog.
ステップ1: Rescue the dog.
ステップ1a: Holding the attached rope, throw a life preserver toward the dog. OR
ステップ1b: Try to hook the dog's collar with a pole. OR
ステップ1c: Row out to the dog in a boat. OR
Step 1d: As a last resort, swim to the dog. Protect yourself. Bring something for the dog to cling to or climb on and be pulled to shore.
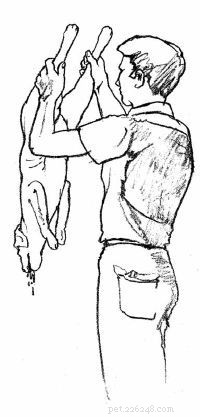
ステップ2: Drain the dog's lungs.
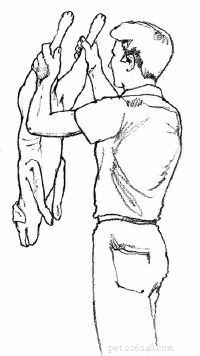
ステップ2a: If you can lift the dog, grasp the rear legs and hold the animal upside down for 15 to 20 seconds. Give 3 or 4 downward shakes to help drain fluid from its lungs.
ステップ2b: If you cannot lift the dog, place it on a sloping surface with its head low to facilitate drainage.
ステップ3: If the dog is not breathing, feel for a heartbeat by placing your fingers about 2 inches behind the dog's elbow in the middle of its chest.
ステップ4: If the heart is not beating, proceed to Step 5. If it is, perform artificial respiration.
Step 4a: Turn the dog on its side.
Step 4b: Extend the dog's head and neck. Hold the dog's mouth and lips closed and blow firmly into its nostrils. Administer 1 breath every 3 to 5 seconds. Take a deep breath, and repeat until you feel resistance or see the chest rise.
Step 4c: After 10 seconds, stop. Watch the dog's chest for movement to indicate it is breathing on its own.
Step 4d: If the dog is not breathing, continue artificial respiration.
ステップ5: If the heart is not beating, perform cardiopulmonary resuscitation (CPR).
ステップ5a: Turn the dog on its back.
ステップ5b: Kneel down at the head of the dog.
ステップ5c: Clasp your hands over the dog's chest with your palms resting on either side of its chest.
Step 5d: Compress your palms on the chest firmly for a count of "2," and release for a count of "1." Moderate pressure is required. Repeat about 60 to 90 times per minute.
Step 5e: Alternately (after 30 seconds), hold the dog's mouth and lips closed and blow firmly into its nostrils. Blow for 3 seconds, take a deep breath, and repeat until you feel resistance or see the dog's chest rise. Try to repeat this 10 to 20 times per minute. As a general rule, use a CPR ratio of about 5 heart compressions to 1 breath of air.
Step 5f: After 1 minute, stop. Look at the chest for breathing movement, and feel for a heartbeat by placing fingers about 2 inches behind the dog's elbow in the center of its chest.
Step 5g: If the dog's heart is not beating, continue CPR. If the heart starts beating, but the dog is still not breathing, return to Step 4.
ステップ5a: Turn the dog on its side.
ステップ5b: Place the palm of your hand in the middle of the dog's chest.
ステップ5c: Press for a count of "2," and release for a count of "1." Firm pressure is required. Repeat about 60 to 90 times per minute.
Step 5d: Alternately (after 30 seconds), hold the dog's mouth and lips closed and blow firmly into its nostrils. Blow for 3 seconds, take a deep breath, and repeat until you feel resistance or see the chest rise. Try to repeat this 10 to 20 times per minute.
Step 5e: After 1 minute, stop. Look at the chest for breathing movement, and feel for a heartbeat by placing your fingers about 2 inches behind the dog's elbow in the center of its chest.
Step 5f: If the dog's heart is not beating, continue CPR. If the heart starts beating but the dog is still not breathing, return to Step 4.
ステップ6: Transport the dog immediately to the veterinarian. CPR or artificial respiration should be continued until the dog is breathing and its heart is beating without assistance.
Puppies love to chew -- and they rarely discriminate between what they chew and what they avoid. If your puppy gets a hold of an electrical cord, you may be faced with treating electrical shock. Check the next section for tips on dealing with this type of pet emergency.
Grown dogs are seldom victims of electrical shock. But puppies are naturally curious and will chew almost anything, including electrical cords. If the insulation is punctured and the mouth comes in contact with both wires, the dog will receive a shock and may be unable to release the cord.
Electrocution can cause severe heart damage and fluid accumulation in the lungs. Strong shock can stop the heart, and CPR will need to be performed immediately to start the heart beating again. In addition, the dog's mouth will likely be burned from contact with the bare wires. Be sure to watch for signs of shock, which include pale or white gums, a rapid heartbeat, or rapid breathing.
To provide the proper care for your pet who is suffering from electrical shock, use the following tips.
ステップ1: If the dog still has the electrical cord in its mouth, DO NOT touch the dog. First remove the plug from its outlet.
ステップ2: If the dog is unconscious, check for breathing. If the dog is conscious and breathing, proceed to Step 6. If the dog is not breathing, feel for a heartbeat by placing your fingers about 2 inches behind the elbow in the middle of its chest.
ステップ3: If the heart is not beating, proceed to Step 4. If it is, perform artificial respiration.
ステップ3a: Turn the dog on its side, and extend its head and neck.

ステップ3b: Hold the dog's mouth and lips closed and blow firmly into its nostrils. Administer 1 breath every 3 to 5 seconds. Take a deep breath, and repeat until you feel resistance or see the chest rise.
Step 3c: After 10 seconds, stop. Watch the dog's chest for movement to indicate the dog is breathing on its own.
Step 3d: If the dog is not breathing, continue artificial respiration.
ステップ4: If the heart is not beating, perform CPR.
Step 4a: Turn the dog on its back.
Step 4b: Kneel down at the head of the dog.
Step 4c: Clasp your hands over the dog's chest with your palms resting on either side of its chest.
Step 4d: Compress your palms on the chest firmly for a count of "2," and release for a count of "1." Moderate pressure is required. Repeat about 60 to 90 times per minute.
Step 4e: Alternately (after 30 seconds), hold the dog's mouth and lips closed and blow firmly into its nostrils. Blow for 3 seconds, take a deep breath, and repeat until you feel resistance or see the dog's chest rise. Try to repeat this 10 to 20 times per minute. As a general rule, use a CPR ratio of about 5 heart compressions to 1 breath of air.
Step 4f: After 1 minute, stop. Look at the chest for breathing movement, and feel for a heartbeat by placing fingers about 2 inches behind the dog's elbow in the center of its chest.
Step 4g: If the dog's heart is not beating, continue CPR. If the heart starts beating, but the dog is still not breathing, return to Step 3.
Step 4a: Turn the dog on its side.
Step 4b: Place the palm of your hand in the middle of the dog's chest.
Step 4c: Press for a count of "2," and release for a count of "1." Firm pressure is required. Repeat about 60 to 90 times per minute.
Step 4d: Alternately (after 30 seconds), hold the dog's mouth and lips closed and blow firmly into its nostrils. Blow for 3 seconds, take a deep breath, and repeat until you feel resistance or see the chest rise. Try to repeat this 10 to 20 times per minute.
Step 4e: After 1 minute, stop. Look at the chest for breathing movement, and feel for a heartbeat by placing your fingers about 2 inches behind the dog's elbow in the center of its chest.
Step 4f: If the dog's heart is not beating, continue CPR. If the heart starts beating but the dog is still not breathing, return to Step 3.
ステップ5: Transport the dog immediately to the veterinarian. CPR or artificial respiration should be continued until the dog is breathing and its heart is beating without assistance.
ステップ6: If the dog's mouth or lips are burned (bright red), swab them gently with 3% hydrogen peroxide.
ステップ7: To conserve body heat, wrap the dog in a blanket or jacket.
Just like humans, dogs often have problems with their eyes due to dust, allergies, and other culprits. See the next page for tips on dealing with eye injuries.
Irritation of the eye in a dog can be caused by allergies, dust and dirt, lashes growing inward, fights, and more. It can result in a mild inflammation of the tissue around the eye (conjunctivitis) or severe damage to the cornea.
When examining a dog's eye, it is important to know that dogs have a third eyelid located in the corner of the eye nearest the nose. This third eyelid can completely cover the eyeball and sometimes gives the appearance that part of the eye is gone.
In addition to being a protective mechanism, the third eyelid can indicate that something is wrong with the eye. If it is raised and looks red, the eye is inflamed. Do not try to touch or manipulate this eyelid.
Other indications that a dog's eye is irritated are squinting and rubbing and pawing at the eye. Your first priority is to prevent your pet from further injuring itself since this often causes more severe damage than the original irritation. Use the following tips to treat your dog's eye injuries.
ステップ1: DO NOT try to remove the object.
ステップ2: Restrain the dog if necessary.
ステップ2a: Approach the dog slowly, speaking in a reassuring tone of voice.
ステップ3: Prevent self-injury to the eye.
ステップ3a: Dewclaws (if present) should be bandaged on the front paw on the same side as the affected eye.
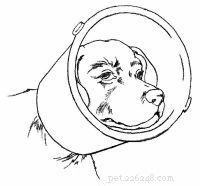
ステップ3b: For small dogs, cut a large piece of cardboard into an Elizabethan-type collar.

Step 3c: For larger dogs, cut the bottom from a plastic bucket, fit the bucket over the dog's head, and hold it in place by tying it to the dog's collar.
ステップ4: Transport the dog immediately to the veterinarian.
The typical signs of a scratched or irritated eye include squinting; rubbing or pawing at the eyes; or thick discharge or redness in the eye.
ステップ1: Restrain the dog if necessary.
ステップ1a: Approach the dog slowly, speaking in a reassuring tone of voice.
ステップ2: Flush the dog's eye thoroughly with saline solution or plain water.
ステップ3: Prevent self-injury to the eye.
ステップ3a: Dewclaws (if present) should be bandaged on the front paw on the same side as the affected eye.
ステップ3b: For small dogs, cut a large piece of cardboard into an Elizabethan-type collar.
Step 3c: For larger dogs, cut the bottom from a plastic bucket, fit the bucket over the dog's head, and hold it in place by tying it to the dog's collar.
ステップ4: Transport the dog immediately to the veterinarian.
A dog can be sensitive to extreme cold, especially its ears and the tip of its tail. If you suspect your pet is suffering from frostbite, take note of the first-aid tips on the next page.
When a dog is exposed to freezing temperatures for a long period of time, there is always the possibility of frostbite. The signs of frostbite include pain, pale skin in early stages, and red or black skin in advanced stages.
The areas most likely to be frostbitten are those that have little or no hair and the ears and tail tip, which have a limited blood supply. Occasionally, if damage from frostbite is severe, part of the tail or ear tips may actually fall off. Professional attention should be sought before this happens. To provide proper care to a dog suffering from frostbite, use the following tips.
ステップ1: Restrain the dog if necessary.
ステップ1a: Approach the dog slowly, speaking in a reassuring tone of voice.
ステップ1b: Slip a leash around the dog's neck, then place the leash around a fixed object. Pull the dog against this object and tie the leash so the dog cannot move its head.
ステップ1c: Muzzle the dog to protect yourself, if necessary.
ステップ2: Warm the area with moist towels. The water temperature should be warm but not hot (75 degrees Fahrenheit/24 degrees Celsius). DO NOT use ointment.
ステップ3: If the skin turns dark, transport the dog to the veterinarian as soon as possible.
Just as exposure to extreme cold can be harmful to your pet, so, too, can extreme heat. Check the next section to learn how to treat a dog that has heatstroke.
Heatstroke is caused by the inability of the body to maintain its normal temperature because of the environmental heat. It is often caused by keeping a dog in a locked car parked in the sun or by keeping it in any hot area without adequate ventilation.
The signs of heatstroke are excessive drooling, lack of coordination, rapid breathing, and a top of the head that is hot to the touch. Prompt treatment is urgent. Body temperatures often get as high as 107 degrees Fahrenheit/41.5 degrees Celsius, and without quick cooling, severe brain damage and death will occur.
Heatstroke can be prevented by making sure your dog has plenty of shade and ventilation. If you must take your dog driving with you, park in the shade and leave all the windows partially open.
Should heatstroke occur, use the following suggestions to help you provide your dog with the utmost care.
ステップ1: Remove the dog from the hot environment.
ステップ2: Immerse the dog in a cold water bath or continuously run a garden hose on its body; continue either treatment for at least 30 minutes.
ステップ3: Apply ice packs to the top of the head; keep them there while transporting the dog to the veterinarian.
ステップ4: Transport the dog to the veterinarian immediately after the above treatment.
Another pet injury that requires immediate professional treatment is hypothermia. Check the next page for tips on what to do if you suspect your pet is suffering from this condition.
Exposure to either cold water or freezing temperatures can cause hypothermia, or subnormal body temperatures. A dog's survival will depend on how low its body temperature drops.
A dog's normal body temperature is 100 to 101 degrees Fahrenheit/38 degrees Celsius. If it drops below 90 degrees Fahrenheit/32 degrees Celsius for any length of time, normal bodily functions will be severely impaired.
The signs of hypothermia include depression, subnormal body temperature, and coma. This condition always requires veterinary attention as soon as possible. Use the following tips to help you provide proper care to a dog suffering from hypothermia.
ステップ1: Warm the dog.
ステップ1a: Place a hot water bottle (100 degrees Fahrenheit/37 degrees Celsius) against the dog's abdomen. Wrap the bottle in a cloth to prevent burns. Wrap the dog in a blanket or jacket.
ステップ2: Transport the dog immediately to the veterinarian.
Just like humans, dogs can be allergic to insect bites, so it's important to know the warning signs. Learn more about treating insect stings on the next page.
While most insect bites to a dogwill be uneventful, if your pet has been stung by a bee, wasp, yellow jacket, or hornet, the area will quickly become swollen and somewhat painful. A possible allergic reaction to the venom deposited by the insect is the most serious problem.
The signs of an insect bite include swelling, pain in the muscles and affected area, vomiting, weakness, fever, and shock. The signs of shock are pale or white gums, a rapid heartbeat, or rapid breathing. Below are helpful suggestions on what to do if your pet has been stung by a pest.
ステップ1: Restrain the dog if necessary.
ステップ1a: Approach the dog slowly, speaking in a reassuring tone of voice.
ステップ1b: Muzzle the dog to protect yourself, if necessary.
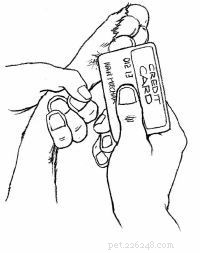
ステップ2: DO NOT pinch the area. If the dog has been stung by a bee, scrape the stinger off immediately with a credit card or dull knife. Other insects do not leave the stinger in the skin.
ステップ3: If the affected area is swollen and hot, apply cortisone cream and hold ice on the dog's skin for a short time.
ステップ4: Administer antihistamine such as diphenhydramine (Benadryl) orally at a dose of 1mg per pound of body weight (e.g., a 25-pound dog would get 25mg pill or capsule).
ステップ5: If the dog experiences any difficulty breathing or if its face seems swollen, transport the dog immediately to the veterinarian.
Did you know your house is filled with products that are poisonous to your beloved pet? Check the next page to find out what they are and what to do if your dog gets a hold of one of these harmful substances.
Dogs are curious creatures and like to investigate, which leads to many accidental poisonings each year. Often a dog will find an open can or bottle of some chemical and, accidentally or on purpose, spill it. Naturally the chemical gets on its fur and paws, and while licking the area clean, it swallows the possibly toxic substance. It is your responsibility as a pet owner to keep all potentially toxic products tightly closed and out of your dog's reach.
Some of the signs of a possible poisoning include excessive drooling, vomiting, diarrhea, abdominal pain, twitching, nervousness, convulsions, coma, and a chemical odor on the body. Here's what you can do if your dog is poisoned:
ステップ1: If the dog is comatose or convulsing, wrap it in a blanket and transport your pet immediately to the veterinarian with the suspect poison container, plant, or leaf.
ステップ2: If the dog has a chemical odor on its skin, wash the entire dog with mild soap until the odor is gone. If the poison was licked or ingested, flushing the dog's mouth with clean water may also help in decontamination.
ステップ3: If the dog has not already vomited and the poison is not a caustic or petroleum product (see lists below), induce vomiting by giving 1 tablespoon of 3% hydrogen peroxide per 20 pounds every 10 minutes until vomiting starts. If no vomiting occurs within 30 minutes, transport the dog immediately to the veterinarian with the suspected poison container.
ステップ4: Call the Pet Poison Control hotline for further instructions at 888-426-4435. (There is a charge for this service.)
Caustics include battery acid, corn and callous remover, dishwashing detergent, drain cleaner, grease remover, lye, and oven cleaner. Petroleum products include paint solvent, floor wax, and dry-cleaning solution.
You might be surprised by the number of household items that are poisonous to your dog. Some of the most common are alcoholic beverages, ammonia, antifreeze, bleach, chocolate (baking chocolate is the worst), detergents, disinfectants, dry-cleaning solution, fertilizer, furniture polish, gasoline, glue, grapes and raisins, human medications, mothballs, mouse and rat poison, onions, oven cleaners, paint thinner and remover, shoe polish, silver polish, and toilet bowl cleaner.
In addition, some household plants are toxic to your pet, including aloe vera, amaryllis, avocado, azalea, bird of paradise, calla lily, castor bean, corn plant, cyclamen, daffodil, day lily, dieffenbachia, Easter lily, elephant ears, English ivy, gladiolus, holly, hyacinth, hydrangea, iris, kalanchoe, macadamia nut, mistletoe, narcissus, onion, philodendron, poinsettia, rhododendron, tomato plant, tulip, yew, and yucca.
(This is only a partial list. For a more complete listing, refer to the ASPCA Animal Poison Center at www.aspca.org.)
Dogs can also become poisoned from smoke or carbon monoxide. Check the next section for tips on what to do in this first-aid emergency.

Fires are another possible threat to dogs. Do not risk your own life to save your dog. Leave that task to the firefighters or those trained in rescue.
The signs of smoke or carbon monoxide inhalation include depression, lack of coordination, heavy panting, deep red gums, and possible convulsions. Also watch for signs of shock, which are pale or white gums, a rapid heartbeat, or rapid breathing.
If suspect your pet is suffering from smoke or carbon monoxide inhalation, use the following tips to provide the dog with proper care.
ステップ1: Remove the dog from the area and into fresh air immediately.
ステップ2: Flush the dog's eyes thoroughly with saline solution or clean water.
ステップ3: Transport the dog immediately to the veterinarian.
ステップ1: Remove the dog from the area and into fresh air immediately.
ステップ2: If the dog is not breathing, feel for a heartbeat by placing your fingers about 2 inches behind the dog's elbow in the middle of its chest.
ステップ3: If the heart is not beating, proceed to Step 4. If it is, perform artificial respiration.
ステップ3a: Turn the dog on its side.
ステップ3b: Hold the dog's mouth and lips closed and blow firmly into its nostrils. Administer 1 breath every 3 to 5 seconds. Take a deep breath, and repeat until you feel resistance or see the dog's chest rise.
Step 3c: After 1 minute, stop. Watch the chest for movement to indicate the dog is breathing on its own.
Step 3d: If the dog is not breathing, continue artificial respiration.
ステップ4: If the heart is not beating, perform cardiopulmonary resuscitation (CPR).
Step 4a: Turn the dog on its back.
Step 4b: Kneel down at the head of the dog.
Step 4c: Clasp your hands over the dog's chest with your palms resting on either side of its chest.
Step 4d: Compress your palms on the chest firmly for a count of "2," and release for a count of "1." Moderate pressure is required. Repeat about 60 to 90 times per minute.
Step 4e: Alternately (after 30 seconds), hold the dog's mouth and lips closed and blow firmly into its nostrils. Blow for 3 seconds, take a deep breath, and repeat until you feel resistance or see the dog's chest rise. Try to repeat this 10 to 20 times per minute. As a general rule, use a CPR ratio of about 5 heart compressions to 1 breath of air.
Step 4f: After 1 minute, stop. Look at the chest for breathing movement, and feel for a heartbeat by placing your fingers about 2 inches behind the dog's elbow in the center of its chest.
Step 4g: If the dog's heart is not beating, continue CPR. If the heart starts beating, but the dog is still not breathing, return to Step 3.
Step 4a: Turn the dog on its side.
Step 4b: Place the palm of your hand in the middle of the dog's chest.
Step 4c: Press for a count of "2," and release for a count of "1." Firm pressure is required. Repeat about 60 to 90 times per minute.
Step 4d: Alternately (after 30 seconds), hold the dog's mouth and lips closed and blow firmly into its nostrils. Blow for 3 seconds, take a deep breath, and repeat until you feel resistance or see the chest rise. Try to repeat this 10 to 20 times per minute.
Step 4e: After 1 minute, stop. Look at the chest for breathing movement, and feel for a heartbeat by placing your fingers about 2 inches behind the dog's elbow in the center of its chest.
Step 4f: If the dog's heart is not beating, continue CPR. If the heart starts beating but the dog is still not breathing, return to Step 3.
ステップ5: Transport the dog immediately to the veterinarian. CPR or artificial respiration should be continued on the way to the veterinarian or until the dog is breathing and its heart is beating without assistance.
A puncture wound can be quite painful and traumatic for a dog. In the next section, we'll learn how to treat this type of injury.
A puncture wound on a dog may be difficult to see because it is often covered with hair. Since the most common location for a puncture wound is the bottom of the paw, the first sign may be a limp. Slightly blood-tinged fur is a common sign of a puncture wound on other parts of the body.
If you suspect your dog has a puncture wound, be sure to watch for signs of shock, which include pale or white gums, a rapid heartbeat, or rapid breathing. The following tips will help you treat your wounded pet.
ステップ1: Restrain the dog if necessary, taking care not to touch the object.
ステップ1a: Approach the dog slowly, speaking in a reassuring tone of voice.
ステップ1b: Slip a leash around the dog's neck, then place the leash around a fixed object. Pull the dog against this object and tie the leash so the dog cannot move its head.
ステップ1c: Muzzle the dog to protect yourself if necessary.
ステップ2: DO NOT attempt to remove the object.
ステップ3: Place clean cloths, sterile dressings, or sanitary napkins around the point of entry.
ステップ4: Bandage tightly around the point of entry.
ステップ5: Transport the dog immediately to the veterinarian.

ステップ1: Restrain the dog if necessary.
ステップ1a: Approach the dog slowly, speaking in a reassuring tone of voice.
ステップ2: If the wound is in the chest and a "sucking" noise is heard, bandage tightly enough to seal the wound, and transport the dog immediately to the veterinarian.
ステップ3: If the wound is not in the chest, clip the hair around the wound.

ステップ4: Examine the wound carefully for foreign objects. If present, remove the object with tweezers or needle-nose pliers.
ステップ5: 傷口をきれいな水で完全に洗い流します。 Avoid home antiseptics, which may cause pain when applied.
ステップ6: DO NOT bandage.過度の出血がない限り、傷口を排出させます。傷が過度に出血する場合は、次の手順に従ってください。
Step 6a: Cover wound with clean cloth, sterile dressing, or sanitary napkin.
Step 6b: ドレッシングの上に手を置き、しっかりと押します。
Step 6c: Keep pressure on the dressing to stop the bleeding.
Step 6d: If blood soaks through the dressing, DO NOT remove it.さらにドレッシングを適用し、出血が止まるまで圧力をかけ続けます。
ステップ7: If the bleeding does not stop within 5 minutes, continue to apply pressure on the wound while transporting the dog to the veterinarian.
Knowing how to identify the signs of shock and how to treat it will help you in many pet first-aid situations. In the next section, learn about proper care for dogs experiencing shock.
Shock is extremely serious; it is the No. 1 killer in accidents. Shock is a reaction to heavy internal or external bleeding or any serious injury that "scares" the body; for example, a large wound or amputation with heavy blood loss. The body tries to compensate for the loss by speeding up the heart rate to keep the blood pressure from falling. At the same time the blood vessels that supply the outside of the body narrow. This is to conserve blood so vital organs of the body can continue to receive their normal blood supply.
However, if there is heavy blood loss or other serious injury, the body overreacts and causes a pooling of blood in the internal organs. This can cause death due to a drop in external blood pressure and possible oxygen starvation of the brain.
The signs of shock include pale or white gums, a rapid faint heartbeat, rapid breathing, or below-normal body temperature (feels cold). If your dog is in shock, use the following tips to provide proper first aid.
ステップ1: Examine the dog for shock.
ステップ1a: Examine the gums by gently lifting the dog's upper lip so the gum is visible. Pale or white gums indicate the dog is almost certainly in shock and may have serious internal injuries and/or bleeding. If the gums are pink, the dog is probably not in shock.
ステップ1b: Determine the dog's heartbeat. Place your fingers firmly on the dog about 2 inches behind the dog's elbow in the center of its chest. Count the number of beats in 10 seconds and multiply by 6. If the dog is in shock its heartbeat may be more than 150 beats per minute.
ステップ2: Place the dog on its side with its head extended.
ステップ3: Gently pull out the dog's tongue to keep the airway open.
ステップ4: Elevate the dog's hindquarters slightly by placing them on a pillow or folded towels.
ステップ5: Stop visible bleeding immediately. If blood is spurting and the wound is on the leg or tail, proceed to Step 6.
ステップ5a: 傷口を清潔な布、滅菌包帯、または衛生ナプキンで覆います。
ステップ5b: ドレッシングの上に手を置き、しっかりと押します。
ステップ5c: 出血を止めるためにドレッシングに圧力をかけ続けます。 If blood soaks through the dressing, DO NOT remove it. Apply more dressing and continue to apply pressure until the bleeding stops. If bleeding does not stop within 5 minutes, continue to apply pressure on the wound while transporting the dog to the veterinarian.
Step 5d: Wrap torn rags or other soft material around the dressing and tie or tape it just tightly enough to keep the bandage on.傷の下から始めて、上向きに包みます。
ステップ6: If bleeding does not stop within 5 minutes, transport the dog immediately to the veterinarian.
ステップ7: To conserve body heat, wrap the dog in a blanket or jacket.
A dog's encounter with a skunk is not only smelly, but it can also be dangerous, since skunks are a major carrier of rabies. Turn to the next page to find out what to do if your pet has been sprayed by a skunk.
Skunks are one of the major carriers of rabies in North America. Therefore, a dog's encounter with a skunk should be treated as more than just a stinky situation. Use the following suggestions to provide proper care for your pet.
ステップ1: Restrain the dog if necessary.
ステップ1a: Approach the dog slowly, speaking in a reassuring tone of voice.
ステップ1b: Slip a leash around the dog's neck, then place the leash around a fixed object. Pull the dog against this object and tie the leash so the dog cannot move its head.
ステップ1c: Muzzle the dog to protect yourself.
ステップ2: Flush the dog's eyes with fresh water.
ステップ3: Remove and destroy leather collars or harnesses.
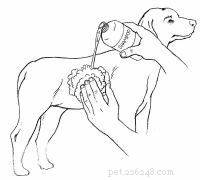
ステップ4: Bathe the dog thoroughly with soap or shampoo and water. Repeat several times.

ステップ5: Apply plain tomato juice liberally. After several minutes, bathe the dog again with soap or shampoo and water. Time will eventually remove the odor. Skunk odor neutralizers are available.
ステップ6: If the skunk is destroyed, take it to the veterinarian for a rabies examination. DO NOT touch the skunk with your bare hands.
ステップ7: If the dog is not currently vaccinated for rabies, contact the veterinarian.
An encounter with a snake can also create a pet emergency situation. See the next section for how to treat snakebites.
Poisonous snakebites are rare in North America. Most snakes are nonpoisonous, and neither poisonous nor nonpoisonous snakes will attack a dog unless provoked. But many pets are curious, and bites will occur.
If you live in or visit a snake-inhabited area, you can expect problems if you let your dog run loose. Be prepared by reading the following tips for treating snakebites.
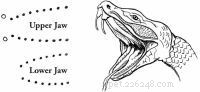
The signs of a poisonous snakebite are two fang marks, pain, swelling, vomiting, difficulty breathing, and possible paralysis and convulsions. Be sure to watch for sings of shock, which include pale or white gums, a rapid heartbeat, or rapid breathing.
Treatment must begin as soon as possible after the bite. If the snake was killed, bring it to the veterinarian for identification. Otherwise, try to remember identifying marks.
ステップ1: Restrain the dog if necessary.
ステップ1a: Approach the dog slowly, speaking in a reassuring tone of voice.
ステップ1b: Slip a leash around the dog's neck, then place the leash around a fixed object. Pull the dog against this object and tie the leash so the dog cannot move its head.
ステップ1c: Muzzle the dog to protect yourself if necessary.
ステップ2: Clip the hair from the bite area.
ステップ3: Flush thoroughly by pouring 3% hydrogen peroxide directly on the bite.
ステップ4: Transport the dog immediately to the veterinarian.
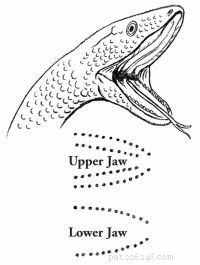
The signs of a nonpoisonous snakebite are a U-shape bite and pain in the bite area. If you are not sure the snake is nonpoisonous, treat as poisonous. See above.
ステップ1: Restrain the dog if necessary.
ステップ1a: Approach the dog slowly, speaking in a reassuring tone of voice.
ステップ1b: Slip a leash around the dog's neck, then place the leash around a fixed object. Pull the dog against this object and tie the leash so the dog cannot move its head.
ステップ1c: Muzzle the dog to protect yourself, if necessary.
ステップ2: Clip the hair from the bite area.
ステップ3: Flush thoroughly by pouring 3% hydrogen peroxide directly on the bite.
Various injuries may cause unconsciousness in a dog. Turn to the next section for tips on what to do in this emergency situation.
Your first priority when dealing with an unconscious dog is to get the heart beating and the dog breathing. Also be sure to watch for signs of shock, which include pale or white gums, a rapid heartbeat, or rapid breathing. Use the following tips to provide proper treatment to a dog that has lost consciousness.
ステップ1: If you suspect choking, clear the dog's airway. If the dog is not choking, proceed to
Step 2.
ステップ1a: Open the dog's mouth carefully by grasping the upper jaw with one hand over the muzzle.
ステップ1b: Press the dog's lips over the upper teeth by pressing your thumb on one side and your fingers on the other so that the lips are between the dog's teeth and your fingers. Apply firm pressure to force the mouth open.
ステップ1c: If you can see the object, try to remove it with your fingers.
Step 1d: If you cannot remove the object and the dog is small enough, pick it up by grasping its back legs; turn it upside down and shake vigorously. Slapping its back while shaking may help to dislodge the object.
Step 1e: If you cannot remove the object and the dog is too large to pick up, place the dog on its side on the floor. Place your hand just behind the rib cage and press down and slightly forward quickly and firmly. Release. Repeat rapidly several times until the object is expelled.
Step 1f: If you cannot dislodge the object, transport the dog immediately to the veterinarian.
ステップ2: If the dog is breathing, check for shock. If the dog is not breathing, proceed to Step 3.
ステップ2a: Examine the gums by gently lifting the upper lip so the gum is visible. Pale or white gums indicate the dog is almost certainly in shock and may have serious internal injuries and/or bleeding. If the gums are pink, the dog is probably not in shock.
ステップ2b: Determine the heartbeat. Place fingers firmly on the dog about 2 inches behind the dog's elbow in the center of its chest. Count the number of beats in 10 seconds and multiply by 6. If the dog is in shock its heartbeat may be more than 150 beats per minute.
ステップ2c: Place the dog on its side with its head extended. Gently pull out the dog's tongue to keep the airway open.
ステップ2d: Elevate the dog's hindquarters slightly by placing them on a pillow or folded towels. To conserve body heat, wrap the dog in a blanket or jacket.
Step 2e: Transport the dog immediately to the veterinarian.
ステップ3: Feel for a heartbeat by placing your fingers about 2 inches behind the dog's elbow in the middle of its chest.

ステップ4: If the dog's heart is not beating, proceed to Step 5. If it is, perform artificial respiration.
Step 4a: Turn the dog on its side.
Step 4b: Hold the dog's mouth and lips closed and blow firmly into its nostrils. Administer 1 breath every 3 to 5 seconds. Take a deep breath, and repeat until you feel resistance or see the dog's chest rise.
Step 4c: After 10 seconds, stop. Watch the chest for movement to indicate the dog is breathing on its own.
Step 4d: If the dog is not breathing, continue artificial respiration.
ステップ5: If the heart is not beating, perform CPR.
ステップ5a: Turn the dog on its back.
ステップ5b: Kneel down at the head of the dog.
ステップ5c: Clasp your hands over the dog's chest with your palms resting on either side of its chest.
Step 5d: Compress your palms on the chest firmly for a count of "2," and release for a count of "1." Moderate pressure is required. Repeat about 60 to 90 times per minute.
Step 5e: Alternately (after 30 seconds), hold the dog's mouth and lips closed and blow firmly into its nostrils. Blow for 3 seconds, take a deep breath, and repeat until you feel resistance or see the dog's chest rise. Try to repeat this 10 to 20 times per minute. As a general rule, use a CPR ratio of about 5 heart compressions to 1 breath of air.
Step 5f: After 1 minute, stop. Look at the chest for breathing movement, and feel for a heartbeat by placing your fingers about 2 inches behind the dog's elbow in the center of its chest.
Step 5g: If the dog's heart is not beating, continue CPR. If the heart starts beating, but the dog is still not breathing, return to Step 4.
ステップ5a: Turn the dog on its side.
ステップ5b: Place the palm of your hand in the middle of the dog's chest.
ステップ5c: Press for a count of "2," and release for a count of "1." Firm pressure is required. Repeat about 60 to 90 times per minute.
Step 5d: Alternately (after 30 seconds), hold the dog's mouth and lips closed and blow firmly into its nostrils. Blow for 3 seconds, take a deep breath, and repeat until you feel resistance or see the chest rise. Try to repeat this 10 to 20 times per minute.
Step 5e: After 1 minute, stop. Look at the chest for breathing movement, and feel for a heartbeat by placing your fingers about 2 inches behind the dog's elbow in the center of its chest.
Step 5f: If the dog's heart is not beating, continue CPR. If the heart starts beating but the dog is still not breathing, return to Step 4.
ステップ6: Transport the dog immediately to the veterinarian. CPR or artificial respiration should be continued on the way to the veterinarian or until the dog is breathing and its heart is beating without assistance.
Like diarrhea, vomiting is not necessarily a serious problem unless a dog becomes dehydrated. Check the next page for tips on what potential problems to look for.
Vomiting is one of the most commonly encountered problems in veterinary medicine. It is nature's way of permitting the dog to rid its stomach of an irritating substance such as spoiled food.
But not all vomiting is due to simple irritation. More serious causes are viral infections or diseases of the liver, pancreas, or kidney. It is important to seek professional help if there are signs of bleeding or if the dog is depressed and still vomiting after initial efforts at control have failed. Here are some tips for treating a vomiting dog:
ステップ1: Remove all food and water for at least 12 to 24 hours.
ステップ2: If vomiting contains blood or is frequent, contact the veterinarian immediately. If not, proceed to Step 3.
ステップ3: After 12 to 24 hours of no vomiting, introduce water gradually at 1 to 2 ounces at a time. If no vomiting occurs, offer a bland diet of boiled skinless chicken and rice (50:50 mixture). If this is held down, transition to regular diet over the next 2 days by mixing an increasing quantity of regular dog food with bland diet.
ステップ4: Pepto-Bismol can be safely used for dogs. Call the veterinarian for recommended dose.
A dog giving birth to puppies can be quite an amazing experience -- for both the dog and its owner. Turn to the next page to learn how to be prepared to help a dog if problems occur during the birth process.
A dog's normal length of pregnancy (gestation period) is 61 to 63 days. However, delivery 1 or 2 days earlier or later is not unusual and presents no cause for alarm as long as the general health of the dog is good.
In preparation for whelping, the dog will make a nest with newspapers and rags if they are available. If they are not, she may dig into the carpeting with her front paws, almost as if she were digging a hole. This is termed "nest building" and is a fairly consistent sign that delivery will follow soon, usually within 2 to 3 days. To make your pet feel comfortable about delivering (and to save your carpet!) provide a whelping box with plenty of newspapers and rags.
At about the same time the nest building occurs, you should also notice an enlargement of the breasts with milk production. Another fairly consistent method of determining when the dog will deliver is to take her temperature each day. Approximately 24 hours before delivery, her temperature will drop about 2 degrees Fahrenheit/1 degree Celsius.
When she is getting close to labor, a mucous discharge appears at the vulva followed by a greenish discharge. At no time should there be a brown or foul-smelling discharge. If this is present, contact your veterinarian immediately.
The onset of labor will make the dog somewhat restless, but it is not until the second stage of labor that she will actually lie down and have abdominal contractions. Once the second stage of labor begins, delivery should begin within 3 hours. If no pups are delivered by that time, professional help should be obtained.
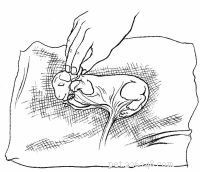
A puppy may be born in one of three ways. The most common presentation is head and feet first. The second most common is rear legs and tail first, not to be confused with a true breech birth. In a true breech only the rump is presented, with the rear legs folded under the body of the puppy. In a small bitch, this type of presentation can cause problems and should be watched for carefully.
Complications may arise during the birthing process that you can handle quite easily by using the tips below.
ステップ1: Grasp the puppy with a clean towel.
ステップ2: Applying steady traction, gently pull the puppy at a slight downward angle. Continue pulling gently and steadily until the pup is delivered.
ステップ3: If you are unable to remove the puppy, contact the veterinarian immediately.
ステップ1: Put the pup, covered in the fetal membrane, on a clean towel.
ステップ2: Peel the membrane off its face immediately.
ステップ3: Continue to pull the membrane from its body. The membrane will collect around the umbilical cord. DO NOT pull on the umbilical cord.
ステップ4: Wipe any fluid off the nostrils and mouth. Rub the puppy's body vigorously with a towel to stimulate breathing.
ステップ5: If there is heavy mucus in the mouth and nose, clean out what you can with your finger.
ステップ6: If the puppy is still having trouble breathing:
Step 6a: Place the puppy in a towel on the palm of your hand.
Step 6b: Cradle its head by closing your thumb toward your fingers.
Step 6c: Using your other hand to secure the puppy, lift your hands to head level and swing firmly down toward the floor. Repeat several times.
Step 6d: Vigorously rub the puppy again with the towel.
Step 6e: Stop when the puppy is actively moving and crying.
ステップ7: Tie a thread around the umbilical cord about 1 inch above the puppy's abdomen. Leaving the tied portion attached to the puppy, cut off the rest of the umbilical cord and fetal membrane.
ステップ8: Place the puppy with its mother. She will take care of the rest. If she does not take care of the puppies, or if any other problem develops, contact the veterinarian as soon as possible.
Seeing a dog hurt or in distress can be such a helpless feeling. By learning the tips outlined in this article, you can arm yourself with dozens of first-aid techniques that may end up saving the life of your beloved pet.
Publications International、Ltd。
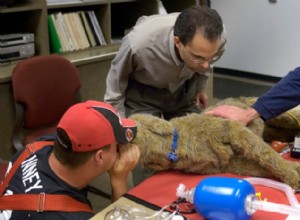
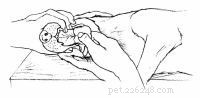
獣医のマイク・エストリン博士(中央)は、ミネソタ州ニューブライトンの2人の消防士に犬のCPRを与える方法を指示します。 CPR練習犬を使用します。 1つは口から鼻への呼吸をシミュレートし、もう1つは肺が空気で満たされていることを感じます。 それは私の最悪の悪夢でした。私の最愛の13歳のイングリッシュブルドッグ、エリーは、私たちの定期的な散歩のある朝、倒れました。彼女はいつものように仕事をしていましたが、帰り道にウェルカムマットに立ち寄って気を失いました。彼女が夢中になったのは永遠のように思えたものでした。 彼女が意識を取り戻したとき、彼女は喘鳴を起こし、呼吸困難でした。その時、私は本能的に
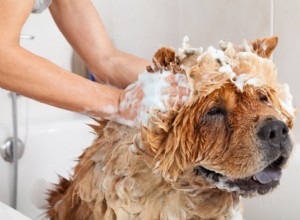
十分な頻度で入浴しないと犬が臭くなることがありますが、それだけが犬の入浴が必要な理由ではありません。入浴は犬のヘアスタイルと肌を健康に保つのに役立ち、犬を清潔に保ち、汚れや寄生虫がないようにするのに役立ちます。 犬の入浴は簡単に思えるかもしれませんが、正しくやりたい場合は考慮すべきことがいくつかあります。まず、犬の不安を防ぐために快適な環境を作る必要があります。犬の入浴時間を快適にすればするほど、定期的な入浴が容易になります。また、犬のアレルギーを引き起こしたり、犬の皮膚やコートを乾かしたりしたくない場合は、適切な製品を選択する必要があります。 良いニュースは、犬に定期的な入浴を提供し、犬